

Pilobolus has created and toured over 120 pieces of repertory to more than 65 countries, and currently performs its work for over 300,000 people across the U.S. and around the world each year. Pilobolus was featured around the world on the “79th Annual Academy Awards Broadcast,“ and on “60 Minutes,” “Sesame Street,” “Oprah,” “Ellen” and “Late Night with Conan O’ Brien.” Pilobolus has been recognized with many prestigious honors, including a Scripps Award in 2000, a Dance Magazine Award in 2010, a TED Fellowship, a 2010 Grammy Award Nomination, and several Cannes Lion Awards at the International Festival of Creativity. In 2015, Pilobolus was named one of Dance Heritage Coalition’s “Irreplaceable Dance Treasures.”
My work with Pilobolus began with initial proof of concept meetings and demonstration in September of 2010. This was followed by a choreography session involving myself, Daniel Soltero, Molly Gawler, Robby Barnett, Itamar Kubvoy, Mike Dostal, and Shane Mongar in November. Finial rehearsals were completed in December and our piece previewed at the amazing Cutler Majestic Theater. Molly was then replaced by Matt Del Rosario due to Molly performing with Shadowland in Europe for the summer of 2011. After teaching Matt the choreography and making some slight tweaks, we premiered Seraph at the American Dance Festival in June 2011 at the Durham Performing Arts Center. The piece was then performed at the Joyce Theater during July and August. Currently, the piece is in active rotation with the dancers piloting the aircraft while on tour. For more information on our collaboration, please read our post on CSAIL News.
Seraph
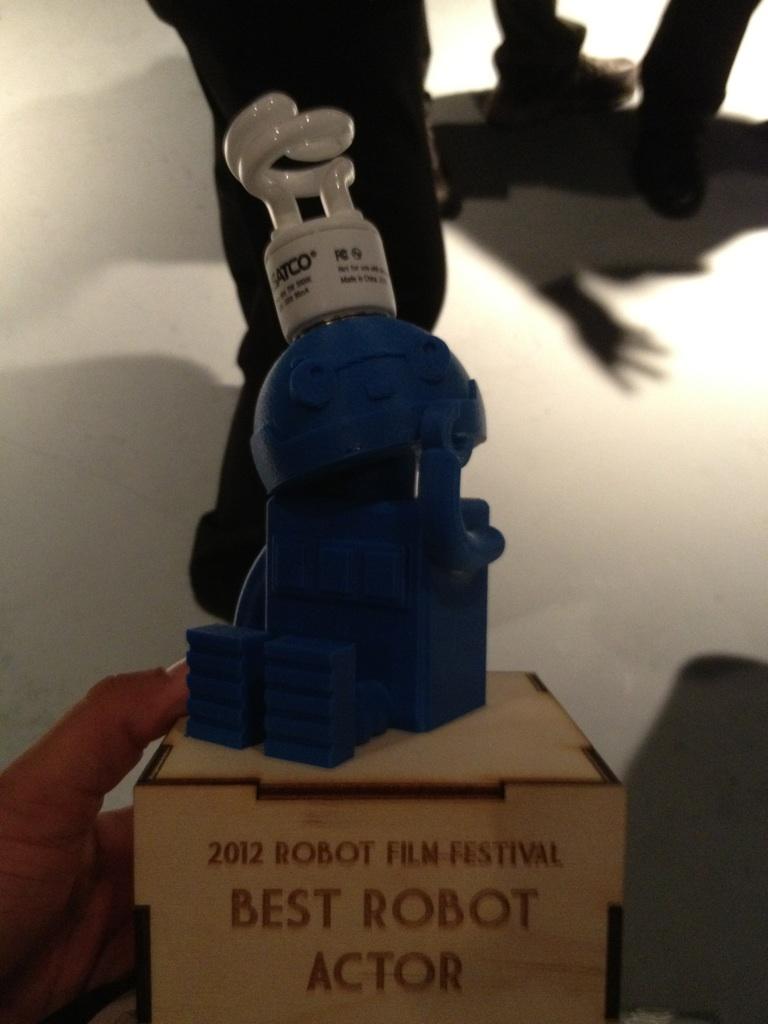
Our video for Seraph was entered in the second annual Robot Film Festival in New York City! The event features a wide range of videos involving technology and robots and we hope our video is well received by the community. We ended up winning an award for “Best Robot Actor.” A picture of our Botsker is below, made by the folks at Makerbot.
For articles, podcasts, reviews, and other media mentions discussing the Seraph piece, please see the Press page.
Shadowland
Following sold-out performances throughout Europe and Asia, Pilobolus’s Shadowland made its North American Premiere at NYU Skirball. Pilobolus’s Shadowland is a mix of shadow theater, dance, circus, and concert, incorporating multiple moving screens of different sizes and shapes to create a performance that merges projected images with front-of-screen choreography. Shadowland was the first show of its kind to combine shadow theater with dance and has since inspired many similar productions around the world.
To support this premiere, I developed an interactive billboard to be displayed in the lobby to external and internal audiences. Using the Microsoft Kinect sensor, the program is able to capture the movement of patrons near the screen and project them as shadows onto the screen. An example of the program in action is showed below.

Kinect Installation
The Microsoft Kinect was released in 2010 and is extensively supported by developers. Thus, it was my primary hardware choice for developing augmented reality applications using a handsfree input device. The Kinect sensor includes an RGB camera, a depth sensor, and a multi-array microphone. The depth sensor uses an infrared laser projector and a CMOS sensor to capture video data in 3D. The Kinect can provide full body 3D motion capture,voice and facial recognition, and gesture recognition for multiple players.
I already had a Kinect for Xbox 360 available, so that was what was used for this project. Microsoft used to develop a Kinect for Windows sensor but announced they consolidated production and only are manufacturing the Kinect for Xbox One currently.
I referenced Rui Wang’s book, “Augmented Reality with Kinect” for basic installation instructions and sample code to get started. I first downloaded the Kinect for Windows SDK v1.8 and the Kinect for Windows Developer Toolkit v1.8. Once everything is installed, you can verify that the Kinect is operating properly using the Developer Toolkit Browser. In the C++ Samples section is a demo called “Skeletal Viewer.” When it is run, the output is similar to the image below. The SDK installs the motor and camera drivers, the APIs, and documentation. The libraries and header files provided by the SDK will be included in the final project executable that is generated.

Development Environment
I first installed Microsoft Visual Studio Express 2012 and this update for free to use as a C++ compiler on Windows. External libraries were also downloaded to provide OpenGL and image rendering support. Since this project requires rendering 2D and potentially 3D objects, FreeGLUT was downloaded. This open source project is an alternative to the OpenGL Utility Toolkit (GLUT) library. Next, FreeImage was downloaded, which provides image reading and writing as well as some basic image manipulations. Lastly, Open Source Computer Vision (OpenCV) library was downloaded which is a library of programming functions for real-time computer vision. Detailed installation instructions are available here.
In Visual Studio, a blank Win32ConsoleApplication is created. Make sure the “Include Directories” point to the FreeImage, FreeGLUT, and OpenCV header files and the “Additional Dependencies” references the FreeImage, FreeGLUT, and OpenCV library paths.
Software Overview
The main source code is called OpenCVShadows.cpp. This section will explain the code in detail. The code consists of a main() function as well as 3 other primary functions. These include the initializeKinect() function, drawDepth() function, and the drawColor() function. The drawColor() function is primarily used for debugging purposes and not required for the final implementation of the project. Therefore, it isn’t described in detail in this section.
The main() function
The main() function is detailed below. It begins by initializing a few empty IplImage variables that will be used to hold image frames for rendering or processing. It also initializes the storage and contours variables that will be used for filtering the depth image.
int main(int argc, char * argv[])
{
	color = cvCreateImage(cvSize(COLOR_WIDTH, COLOR_HIGHT), IPL_DEPTH_8U, 4);

	depth = cvCreateImage(cvSize(DEPTH_WIDTH, DEPTH_HIGHT),IPL_DEPTH_8U, CHANNEL);

	filter = cvCreateImage(cvSize(DEPTH_WIDTH, DEPTH_HIGHT),IPL_DEPTH_8U, 1);

	final = cvCreateImage(cvSize(DEPTH_WIDTH, DEPTH_HIGHT),IPL_DEPTH_8U, CHANNEL);

	imgBackground = cvCreateImage(cvSize(COLOR_WIDTH, COLOR_HIGHT), IPL_DEPTH_8U, 4);

	cvSet(final, CV_RGB(255,255,255));

	storage = cvCreateMemStorage(0);

	contours = 0;
The next section loads a video file and background image. Originally, the concept was to continually switch between an interactive section on the display followed by a video advertisement for the show. This wasn’t implemented but the code to support this functionality remains. The background image is also loaded. This lets the user display the shadows on a custom background. For the demo, this is a solid orange background, but Pilobolus replaced it with a custom white background with the Shadowland logo when this was finally implemented at their shows. Lastly, the clock is started. This was used to set a time to switch a sample video on and off but will not be used in this description of the code.
	g_Capture = cvCaptureFromFile("video1.avi");

	imgBackground = cvLoadImage("background.png");

	if (!imgBackground){
		printf("Image can NOT Load!!!\n");
		return 1;
         }

         start = clock();
Next, the OpenCV display windows are created and the Kinect is initialized. This initialization function is described in more detail in the next section. Finally, the main while loop is called which reads in an image from the Kinect and runs the main processing and visualization function, drawDepth().
	cvNamedWindow("color image", CV_WINDOW_AUTOSIZE);

	cvNamedWindow("Pilobolus Shadows", CV_WINDOW_NORMAL);

	cvSetWindowProperty("Pilobolus Shadows", CV_WND_PROP_FULLSCREEN, CV_WINDOW_FULLSCREEN);

	if (!initializeKinect()){
		return 1;
	}

	while (1)
	{
		//WaitForSingleObject(h1, INFINITE);
		//drawColor(h2, color);
		WaitForSingleObject(h3, INFINITE);
		drawDepth(h4, depth);

		//exit
		int c = cvWaitKey(1);
		if (c == 27 || c == 'q' || c == 'Q')
			break;
     }
If the program is exited for any reason, the main() function ends with variable and memory clean-up.
	cvReleaseImageHeader(&depth);
	cvReleaseImageHeader(&color);
	cvReleaseCapture(&g_Capture);
	cvDestroyWindow("depth image");
	cvDestroyWindow("color image");

	context->NuiShutdown();

return 0;
The initializeKinect() function
The first step after the variables are initialized is to make sure the computer can properly talk to the Kinect and to properly configure the Kinect to provide the information needed for this application. This is done by executing the initializeKinect() function detailed below.
The first step in the function is to identify the number of Kinects connected to the computer. Next, a Kinect sensor object is created so that the application can open and use it.
bool initializeKinect()
{
	//Check if there are any Kinect sensors connected and obtain the number
	int numKinects = 0;
	HRESULT hr = NuiGetSensorCount( &numKinects );
	if ( FAILED(hr) || numKinects<=0 )
	{
		std::cout << "No Kinect device found." << std::endl;
		return false;
	}
	else{
		std::cout << "Found " << numKinects << " Kinect device(s)." << std::endl;
	}

	//Create the sensor object and set it to context. Only use the first device found.
	hr = NuiCreateSensorByIndex( 0, &context );
	if ( FAILED(hr) )
	{
		std::cout << "Failed to connect to Kinect device." << std::endl;
		return false;
}
Once the Kinect is located and opened, the final potion of this function configures the Kinect. First, the Kinect is initialized to produce the color and depth images as well as starting the skeleton tracking engine. The subsequent sections further configure the color and depth streams with the desired resolutions and other variables as well as setting specific settings for the skeleton tracking engine.
	//Initialize the sensor with color/depth/skeleton enabled
	DWORD nuiFlags = NUI_INITIALIZE_FLAG_USES_SKELETON | NUI_INITIALIZE_FLAG_USES_COLOR | NUI_INITIALIZE_FLAG_USES_DEPTH_AND_PLAYER_INDEX;
	hr = context->NuiInitialize( nuiFlags );
	if ( FAILED(hr) )
	{
		std::cout << "Failed to intialize Kinect: " << std::hex << (long)hr << std::dec << std::endl;
		return false;
	}

	//Open color and depth video streams for capturing. Resolution set to 640x480
	h1 = CreateEvent(NULL, TRUE, FALSE, NULL);
	h2 = NULL;
	hr = context->NuiImageStreamOpen(NUI_IMAGE_TYPE_COLOR, NUI_IMAGE_RESOLUTION_640x480, 0, 2, h1, &h2);
	if ( FAILED(hr) )
	{
		std::cout << "Unable to create color stream: " << std::hex << (long)hr << std::dec << std::endl;
		return false;
	}

	h3 = CreateEvent(NULL, TRUE, FALSE, NULL);
	h4 = NULL;
	hr = context->NuiImageStreamOpen(NUI_IMAGE_TYPE_DEPTH_AND_PLAYER_INDEX, NUI_IMAGE_RESOLUTION_640x480, 0, 2, h3, &h4);
	if ( FAILED(hr) )
	{
		std::cout << "Unable to create depth stream: " << std::hex << (long)hr << std::dec << std::endl;
		return false;
	}

	//Enable skeleton tracking
	hr = context->NuiSkeletonTrackingEnable( NULL, 0 );
	if ( FAILED(hr) )
	{
		std::cout << "Unable to start tracking skeleton." << std::endl;
		return false;
	}

	std::cout << "Kinect Initialized Successfully" << std::endl;

	return true;
}
The drawDepth() function
Once the variables and the Kinect are properly initialized, the final step is to continually process each image to produce the desired output and render it on the display. This is done by executing the drawDepth() function.
The first portion of the drawDepth() function processes the Kinect depth image information. During initialization of the Kinect depth image, a flag was set to use a player index. The Kinect is able to track the depth information of multiple players simultaneously. In the function below, we start by reading in the Kinect depth image. This image is then enumerated through and any pixels associated with a player index are set to black while pixels not containing a person are set to white. This binary image produces the initial shadow of the players. This information is then stored into an OpenCV image variable for further post-processing.
int drawDepth(HANDLE h, IplImage* depth)
{
	const NUI_IMAGE_FRAME * pImageFrame = NULL;
	HRESULT hr = NuiImageStreamGetNextFrame(h, 0, &pImageFrame);
	if (FAILED(hr))
	{
		cout << "Get Image Frame Failed" << endl;
		return -1;
	}

	INuiFrameTexture * pTexture = pImageFrame->pFrameTexture;
	NUI_LOCKED_RECT LockedRect;
	pTexture->LockRect(0, &LockedRect, NULL, 0);
	if (LockedRect.Pitch != 0)
	{

		USHORT * pBuff = (USHORT*) LockedRect.pBits;
		for (int i = 0; i < DEPTH_WIDTH * DEPTH_HIGHT; i++)
		{
			BYTE index = pBuff[i] & 0x07;
			USHORT realDepth = (pBuff[i] & 0xFFF8) >> 3;
			BYTE scale = 255 - (BYTE)(256 * realDepth / 0x0fff);
			buf[CHANNEL * i] = buf[CHANNEL * i + 1] = buf[CHANNEL * i + 2] = 0;

			// Color by Player Index
			switch (index)
			{
			case 0:	//No Player Index -> set to white
				buf[CHANNEL * i] = 255;
				buf[CHANNEL * i + 1] = 255;
				buf[CHANNEL * i + 2] = 255;
				break;
				//Players 1-7 set to black
			case 1:
				buf[CHANNEL * i] = 0;
				buf[CHANNEL * i + 1] = 0;
				buf[CHANNEL * i + 2] = 0;
				break;
			case 2:
				buf[CHANNEL * i] = 0;
				buf[CHANNEL * i + 1] = 0;
				buf[CHANNEL * i + 2] = 0;
				break;
			case 3:
				buf[CHANNEL * i] = 0;
				buf[CHANNEL * i + 1] = 0;
				buf[CHANNEL * i + 2] = 0;
				break;
			case 4:
				buf[CHANNEL * i] = 0;
				buf[CHANNEL * i + 1] = 0;
				buf[CHANNEL * i + 2] = 0;
				break;
			case 5:
				buf[CHANNEL * i] = 0;
				buf[CHANNEL * i + 1] = 0;
				buf[CHANNEL * i + 2] = 0;
				break;
			case 6:
				buf[CHANNEL * i] = 0;
				buf[CHANNEL * i + 1] = 0;
				buf[CHANNEL * i + 2] = 0;
				break;
			case 7:
				buf[CHANNEL * i] = 0;
				buf[CHANNEL * i + 1] = 0;
				buf[CHANNEL * i + 2] = 0;
				break;
			}
		}
		cvSetData(depth, buf, DEPTH_WIDTH * CHANNEL);
}
The initial depth image is developed on an individual pixel basis. While accurate, this image doesn’t contain smooth edges similar to a shadow. An example output is below.

This next section filters the original pixelated depth image, identifies the contours of the people, and fills in those contours to create a smooth, shadow-like image. Note that the background is filled in with red and the shadow pixels are now white. This will be fixed in the subsequent section of this function.
		// Filter to remove pixelation
		cvMorphologyEx(depth, depth, 0, 0, CV_MOP_OPEN,2);
		cvSmooth(depth, depth, CV_MEDIAN, 11);
		cvMorphologyEx(depth, depth, 0, 0, CV_MOP_CLOSE,2);

		//Find contours
		cvCvtColor(depth, filter, CV_RGB2GRAY);
		cvFindContours( filter, storage, &contours, sizeof(CvContour),CV_RETR_TREE, CV_CHAIN_APPROX_SIMPLE, cvPoint(0,0) );
		contours = cvApproxPoly( contours, sizeof(CvContour), storage, CV_POLY_APPROX_DP, 1.5, 1);
		cvDrawContours(final, contours, CV_RGB(255,0,0), CV_RGB(255,0,0), 10, CV_FILLED, CV_AA, cvPoint(0,0));
For comparison purposes, an example of the image post processing is shown below.

The final section places the player’s shadows on the background image that was initially loaded. This act similar to a green screen. The code below goes through each pixel in the image. If the pixel is a shadow, and therefore white, that pixel value is set to black to look like a shadow. If the pixel is not white, it is replaced by the value of that same pixel in the background image.
		CvScalar currentBackgroundPixel;
		for (int i=0; i<color->width; i++)
		{
			for (int j=0; j<color->height; j++)
			{
				CvScalar currentPixel = cvGet2D(final, j, i);
				// compare the RGB values of the pixel. if white, set to black
				if (currentPixel.val[1] > 250 ) //&& currentPixel.val[1] > 250 && currentPixel.val[2] > 250
				{
					currentBackgroundPixel.val[0] = 0;
					currentBackgroundPixel.val[1] = 0;
					currentBackgroundPixel.val[2] = 0;
					cvSet2D(color, j, i, currentBackgroundPixel);
				}
				else{ //if not white, use background image

					// copy the corresponding pixel from background
					currentBackgroundPixel = cvGet2D(imgBackground, j, i);
					cvSet2D(color, j, i, currentBackgroundPixel);

				}
			}
		}

		cvShowImage("Pilobolus Shadows", color);

}
This process takes the previously white shadows, converts them to black shadows, and overlays them on the background image. An example output is shown below using a solid orange background image.

The program is best suited for indoor or covered locations since direct sunlight impacts the depth sensor functionality of the Kinect. The image at the top of this section shows an example of the final version of this software that was used in the lobby to promote the Shadowland premier in NYC in 2016. As evident in that image, this software supports multiple people at once as inputs and can render multiple shadows simultaneously. An example .exe file to run this program is available here.
[simple-social-share]